Login and Authentication: Part 1
- Sign in
- Ueberauth and Guardian
- Plugs
In this section, we go over Elixir plugs and add user authentication with Ueberauth and Guardian. We also set up an authentication controller (AuthController) to handle requests that need authorization.
Account login
Now that we can register for an account, we'll want to sign in. But what does it mean to "log in"? The question is more complex than most people realize. There are many ways of approaching this problem, but we are going to use a JSON web token (JWT) for user authentication.
A JSON web token is a random string that our server generates after a user passes in valid credentials (username and password). A JSON web token looks something like this:
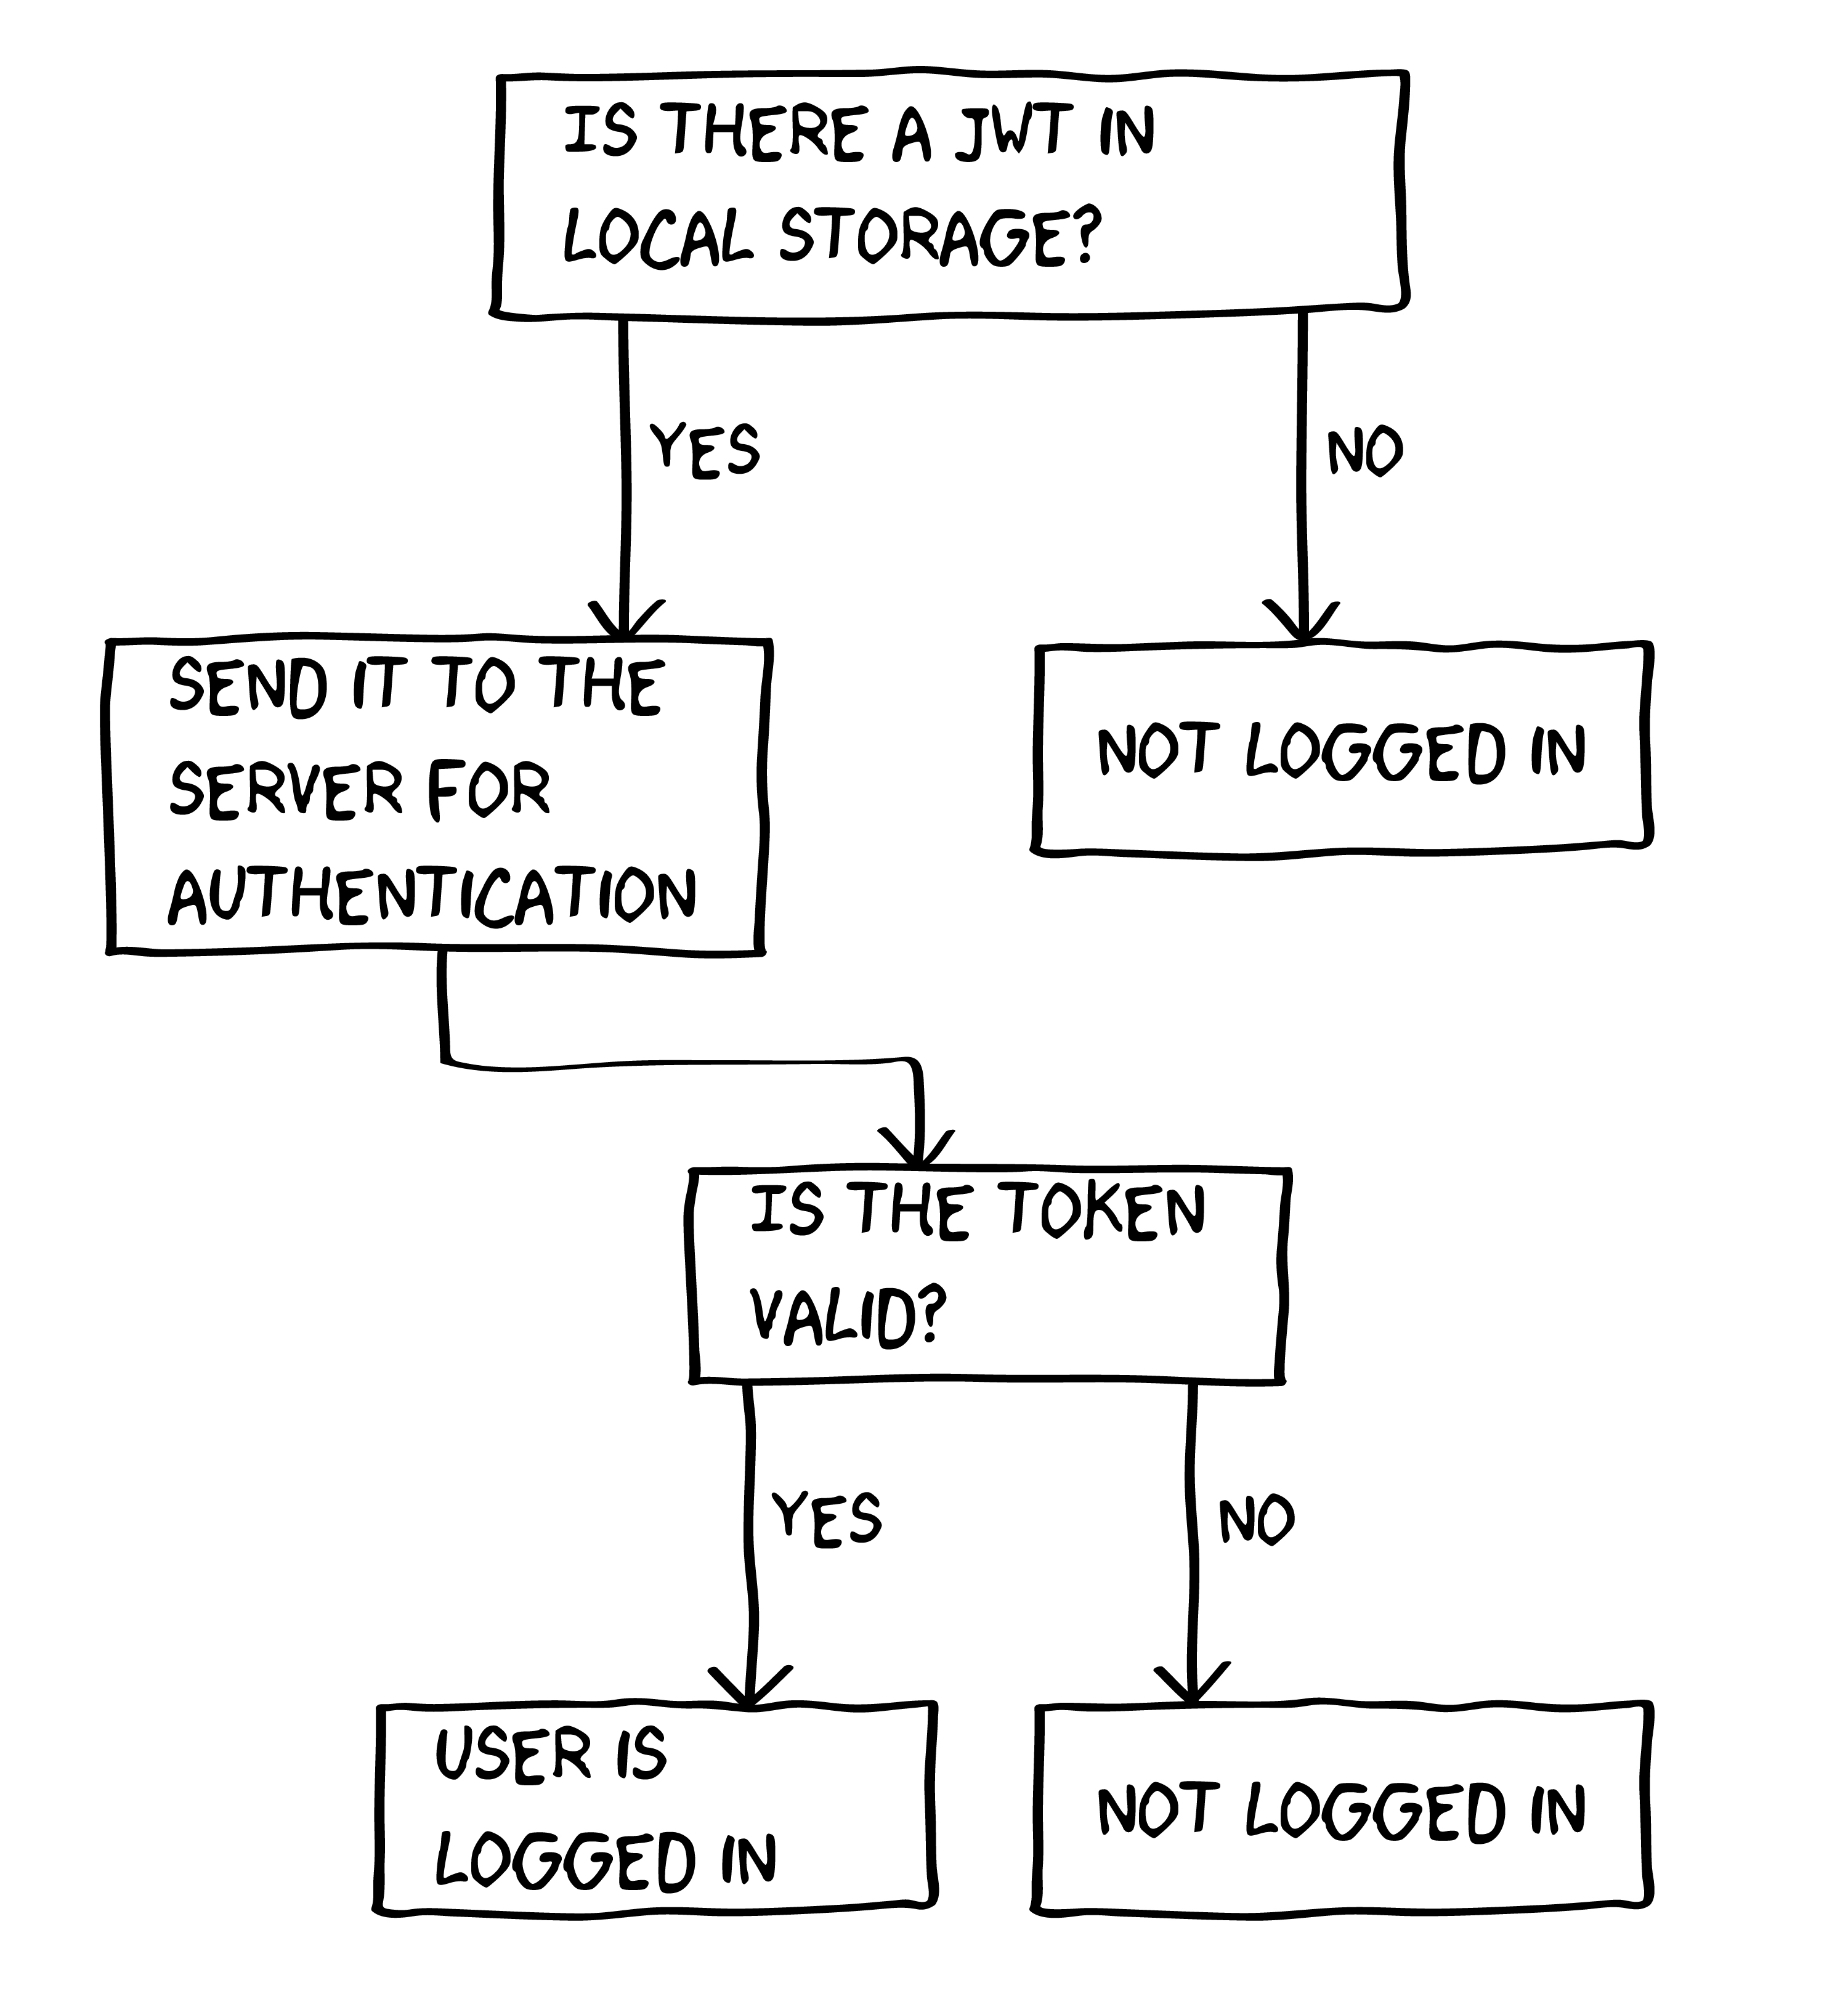
2b125jQggWD1BFWECdbQyxe4KXVB18Sgi64m9Iu2MgCciljCCsIGWhen a user passes valid credentials to our server, our server will respond with a JSON web token that we can store in our browser either in cookies or localStorage. For a user to be considered "logged in", we send that JSON web token in a request to our server asking, "Is this JSON web token still valid?" If the response is in the affirmative, then the user is logged in. If the response is negative, then the user is not logged in.
When a user logs out, we remove the JSON web token from localStorage and send a request to our server to invalidate the token to ensure it cannot be used again. This prevents what is called a replay attack where someone uses an old JSON web token to gain access to your account.
The basic strategy we're going to use follows the flow chart below.
For more information on how JSON web tokens work, check out jwt.io.
For authentication we'll work with Überauth (often spelled Ueberauth, without the u-umlaut -- this is how we will refer to it going forward). Ueberauth is an authentication framework that allows us to use many different strategies to authenticate users. For now we'll use Ueberauth Identity to implement our email-password authentication but later we can use Ueberauth Twitter, Ueberauth Facebook, and several others.
In addition to Ueberauth and Ueberauth Identity, we'll use Guardian to generate our JSON web tokens. If you're not familiar with JSON web tokens, we will cover them in greater detail later.
If you're interested to see how Ueberauth works with multiple strategies, take a look at the Ueberauth Example project provided by the Ueberauth team.
Let's go ahead and add ueberauth, ueberauth_identity, and guardian to our project's dependecies in mix.exs:
defp deps do [ {:comeonin, "~> 2.3"}, ... {:ueberauth, "~> 0.2"}, {:ueberauth_identity, "~> 0.2"}, {:guardian, "~> 0.10"} ]endWe need to add both ueberauth and ueberauth_identity to our project's applications:
def application do [mod: {PhoenixChat, []}, applications: [ :comeonin, ... :ueberauth, :ueberauth_identity ]]endLet's run mix deps.get and get our new dependencies:
$ mix deps.getConfiguring Ueberauth
The next thing to do is configure Ueberauth. Within config/config.exs, add the following:
config :ueberauth, Ueberauth, providers: [ identity: { Ueberauth.Strategy.Identity, [callback_methods: ["POST"]] } ]This is taken straight from the docs, but what it is doing is telling Ueberauth that we are using the identity strategy to log in users with a username-password combination. At some point later on, we can add Twitter and Facebook login to the providers list.
Configuring Guardian
While we're in config/config.exs let's add our Guardian configuration:
config :guardian, Guardian, issuer: "PhoenixChat", ttl: {30, :days}, secret_key: "uw/27wdrIquPn2fktwfJg9tg8qOl5ysTPCFjISw1TCCaLlfWgRUAea1SuWcfERzX", serializer: PhoenixChat.GuardianSerializer, permissions: %{default: [:read, :write]}Before we go any further, let's generate a new secret_key (it's not very secret otherwise). We can either come up with a random string or we can use the handy generator provided by Phoenix:
$ mix phoenix.gen.secretCopy and paste the output into the secret_key value above and we're done. For now storing the secret_key in the file is fine but later we will move this into a system environment variable; relying on our system's environment lets us remove passwords and secret keys from our code and source control, limiting its exposure.
The last step of our Guardian configuration is to create the PhoenixChat.GuardianSerializer we specified. We'll put this file in a new directory within the web directory:
$ mkdir web/auth$ touch web/auth/guardian_serializer.exLet's open the serializer at web/auth/guardian_serializer.ex and update the file to look like this:
defmodule PhoenixChat.GuardianSerializer do @behaviour Guardian.Serializer alias PhoenixChat.{Repo, User} def for*token(%User{id: id}), do: {:ok, "User:#{id}"} def for_token(*), do: {:error, "Unknown resource type"} def from*token("User:" <> id), do: {:ok, Repo.get(User, id)} def from_token(*), do: {:error, "Unknown resource type"}endWe don't need to dig into this too much as this is verbatim from the Guardian documentation. Once we start using our authentication system, we can come back to this and it will make more sense. The serializer is what ties Guardian in with our user systems. Guardian relies on the for_token/1 function to convert a given %User{} into a token. The from_token/1 function does the opposite, retrieving our user from a given token.
A quick thing to note is @behaviour. Elixir is built on Erlang, which uses the British version of some English words. Just keep that in mind going forward.
The next few steps require a deeper dive into Phoenix.
Plugs
In many ways, every app is just a series of functions. React has popularized this approach on the frontend, each function either transforms data or triggers a side-effect like rendering to the DOM or a change to the database.
Plug is a library that takes a connection and returns a modified version of the connection. With plugs you can authenticate users, validate requests, send HTTP responses, sanitize inputs, and trigger background work. Throughout this course, we'll cover these and many other uses for plugs.
Since plugs are so flexible it's no surprise that our Phoenix app is nothing more than a series of plugs.
Creating our AuthController
For this controller we're not going to use a generator. Instead, we're going to create it manually so we can take a closer look at the different components.
The way the Phoenix directory structure is set up everything web-related lives within the web directory. Since we are building a web API, most of what we are doing will be within this directory.
Let's create our auth controller:
$ touch web/controllers/auth_controller.exNow update the new file to look like this:
defmodule PhoenixChat.AuthController do use PhoenixChat.Web, :controller plug UeberauthendHere we define our new module and include some helper methods from the PhoenixChat.Web module for controllers. We've also included a plug for Ueberauth in our controller. When requests come into our controller, they will be routed through the Ueberauth plug. We'll revisit the Ueberauth plug shortly.
Note on debugging in Elixir: In Elixir, you can log to the terminal with IO.puts or Logger.debug after adding require Logger. This is one of the primary means by which you can debug your apps. It's identical to console.log() if you're a JavaScript developer or puts if you're a Ruby developer.
In fact, we will keep this controller mostly empty for the time being and just add a log to show that it was hit. This will cause an error, but it will show that the request was hit. Change your AuthController to the following:
defmodule PhoenixChat.AuthController do use PhoenixChat.Web, :controller def test(conn, _params) do IO.puts "AuthController called!" conn endendOpen web/router.ex and make the following changes:
...scope "/api", PhoenixChat dopipe_through :api get "/auth", AuthController, :test resources "/users", UserController, except: [:new, :edit]end...For now we want to direct anyone who runs a GET request to /api/auth to be routed to the AuthController and the test/2 function we created.
To try out our new route, start your server:
$ mix phoenix.serverGenerated PhoenixChat app[info] Running PhoenixChat.Endpoint with Cowboy using http on port 4000Open up a browser and visit localhost:4000/api/auth. We won't see anything in the browser because we aren't telling Phoenix to render any HTML, but if you head over to your terminal (the one in which you ran mix pheonix.server), you should see the output "AuthController called!" just before the error.
[info] GET /api/authAuthController called![debug] Processing by PhoenixChat.AuthController.test/2 Parameters: %{} Pipelines: [:api] ...This is a contrived example, but you can see the following happen:
connection|> router|> api_pipeline|> AuthController.testThe connection was sent through a series of functions and transformations before finally being returned to the user.
Previous: Actions, Reducers, and StoreNext: Login and Authentication: Part 2