Basics of Webpack
- Set up Webpack
- Hello World!
In this section, we set up Webpack and get our Hello World! app running.
Webpack configuration
Now that we have all of our NPM dependencies set up, we need to configure Webpack. As mentioned before, this is not the simplest task. There are a seemingly limitless number of configuration options, but for now, we will only use the minimum.
Create a file using the touch command in your /phoenix-chat-frontend directory called webpack.config.js.
$ touch webpack.config.jsIn that file, add the following configuration options, which we will go over line-by-line below the code:
var path = require("path")var webpack = require("webpack")module.exports = { devtool: "eval", entry: ["webpack-dev-server/client?http://localhost:3000", "./app/index"], output: { path: path.join(__dirname, "dist"), filename: "bundle.js", }, module: { loaders: [ { test: /\.js$/, loaders: ["babel"], exclude: /node_modules/, include: path.join(__dirname, "app"), }, ], }, resolve: { extensions: ["", ".js"], },}The first line requires the Node's path, which is used to keep track of directory names. This is not strictly necessary, but makes directory paths clearer.
The second line requires webpack. We need this because we are going to use some of the plugins from Webpack later on in the configuration.
Next we have our devtool, which we set to eval. This just sets your debugging tool to one of several options, but almost everyone uses eval because it builds faster. If you want better bug tracking, you should use source-map or inline-source-map.
The next configuration option is entry. Entry is an important concept in Webpack because it defines all the modules that are to be loaded when you start the app, with the last one being exported. This is an important piece to understand, so we will go into greater detail.
The first entry point is the webpack-dev-server, which we want to run our app through first. Next, we run it through the Webpack hot loader, which hot-loads our code and allows the changes you make to take effect immediately without losing the state of your app. The last thing is app/index. This will finally export whatever we eventually put in the index.js file, which we will create shortly.
You might be wondering at this point why we left off the .js part of index.js in our configuration file. That's because of the resolve configuration option, which allows us to leave off the file extensions of any named file type--in this case, .js.
The next configuration option is output. This is another important part of webpack to be aware of. Because React is all JavaScript, Webpack is able to bundle everything into a single file (though not necessarily one file, as we will see much later in this course) and insert it into a script tag in your app.
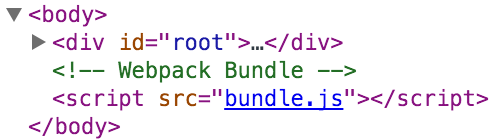
In our case, we are cleverly naming our bundle, bundle.js. We are also specifying the location of all static assets to be compiled into dist/. If you want to see webpack in action or look at what would be built in production, you can run webpack from the command line and it will compile your app and drop it in phoenix-chat-frontend/dist.
The next line is our list of loaders. By the time this project is through, we will have several additional loaders for different types of files. This is where you tell Webpack how to handle different file types. You can handle images (.png, etc), styling (.less, .scss, etc), and just about any other type of file imaginable--even file extensions that you set arbitrarily, such as .potato. Loaders are among the most useful features of webpack, and they are the easiest to understand.
Also within our loaders, we are telling it to ignore any files within our node_modules directory, because those files are already compiled, and we telling it to explicitly look for files within our app directory.
The flow chart below shows the logic of this basic webpack app.
We now have a functional (if basic) webpack configuration.
Server configuration
The last piece of configuration we need is to configure our server. Recall we changed our npm start script to call a server.js file so we could add some additional configuration. So the first thing we need to do is create the server.js file in our /phoenix-chat-frontend directory.
$ touch server.jsIn that file, add the following configuration:
var webpack = require("webpack")var WebpackDevServer = require("webpack-dev-server")var config = require("./webpack.config")new WebpackDevServer(webpack(config), { historyApiFallback: true,}).listen(3000, "localhost", function (err, res) { err ? console.log(err) : console.log("Listening at localhost:3000")})First we declare our dependencies for this module (webpack, webpack-dev-server, and webpack.config), then we create a new WebpackDevServer, with some of the options from our Webpack configuration and tell it to listen on port 3000.
The historyApiFallback is necessary for handling route changes. We will start out with something called hashHistory (explained in detail later), which handles all routing on the client with no server-side configuration necessary. This flag makes routing possible for single page apps. If you want to dig deeper into why this is, check out this resource.
If there is an error, it tells us there was an error. Otherwise, it logs Listening at localhost:3000.
HTML, React, and ReactDOM
There are only two remaining additions we need to make to get our "Hello World!" app running. First we need an index.html in our root directory, then we need to create our app/index.js file to render to the page.
Go ahead and create an index.html file in the root directory and add the following.
$ touch index.html<html> <head> <title>PhoenixChat.io</title> <meta name="description" content="Free, easy-to-use React component for real-time chat with prospective customers." /> <meta name="viewport" content="width=device-width, initial-scale=1" /> <meta charset="UTF-8" /> </head> <body> <div id="root"></div> <script src="bundle.js"></script> </body></html>Google actually doesn't care about most meta tags, but it does care about the description tag.
The next meta tag is the viewport tag, which makes it possible to resize your app based on the size of the screen that is viewing it--namely, this is what makes viewing your site on a mobile device possible. Pretty much every app should have this tag.
We are also including a meta tag that sets the charset to UTF-8. This is not usually necessary since most browsers will assume this is the case. This allows you to use lots of new characters and symbols. For more on this, check out UTF-8.
Next is the body, in which we are creating a div with an id of root. It is within this div that we will create our entire app. Though it is possible to render your app directly to document.body, it is bad practice and should be avoided. If this point is confusing, it will become clear once we fill out our index.js file.
The last thing we add is a script tag that links to bundle.js. This is where Webpack puts all of our React code to allow us to render our app. You may recall in our Webpack configuration we set our output to have a filename of bundle.js and a path of dist. This is where we reference that configuration option.
Let's create a few basic files that we'll use later while building the app. First, create an app directory within /phoenix-chat-frontend, and then a file called index.js within app:
$ mkdir app$ touch app/index.jsNow, within our app/index.js file, we want to write the code that will render our app. First, let's create a React component that will render the text "Hello World!" within a div.
import React from "react"class HelloWorld extends React.Component { render() { return <div>Hello World!</div> }}The next thing we need to do is render that component to the DOM. For that, we need react-dom. Change your code to the following to tell ReactDOM to render your component under the div we created in our index.html file with an id of root.
import React from "react"import ReactDOM from "react-dom"class HelloWorld extends React.Component { render() { return <div>Hello World!</div> }}ReactDOM.render(<HelloWorld />, document.getElementById("root"))Hello World!
We're finally done with configuration! Now it's time to start the app. Within the phoenix-chat-frontend/ directory, run the following commands to install all your npm dependencies and start your app (using the script we created at the beginning of this lesson):
$ npm install && npm startYou should now have an app that renders "Hello World!" to the screen like this
coming soon
Additional
There are a few optional configurations you can do that will save you some headache down the road. If you're using git for version tracking, you should probably add a .gitignore to make sure you don't commit your node_modules. Within a .gitignore file in the root of your app, simply add the line node_modules and git will not track anything in that folder.
If you're on a Mac, you should probably add .DS_Store to this list as well, because they're annoying. And while you're at it, add npm-debug.log incase you try to run npm start from the wrong directory, or cause any other errors with npm. And since everything in dist will be created from the contents of app, we can safely ignore its contents.
$ touch .gitignorenode_modules.DS_Storenpm-debug.logdistA few additional notes regarding common practices. JavaScript generally uses camelCase, Elixir uses PascalCase, and erlang uses under_scores. You will occasionally use erlang code within Phoenix.
